APS-C使用50的镜头如何靠用走的方法拍全狮子座

网上有个段子:某兄在摄影群里说“50头没法拍下一个完整的狮子座” 然后一个人告诉他说“年轻人,用定焦的话要靠走的……你拍不下你往后走走啊……”
如果这个方案可行的话,我们来看一下需要后退远才能实现这个想法。
首先段子的作者使用的的APS-C尺寸的数码相机,50mm焦距的镜头。从网上的全幅相机焦距——视场对照表得到,50的头对应视场为46度,可以装下整个狮子座,而使用APS-C的佳能相机时,需要乘以1.6,得到等效焦距80mm,对应视场为30度左右。
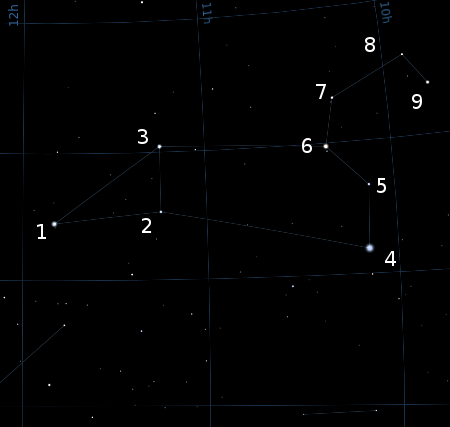
如图,我们常说的狮子座主要是指这九颗星
从HIP星表中查得数据,导入程序

python
initAlphas_time = np.array([[11,49,44],
                            [11,14,56],
                            [11,14,48],
                            [10, 9, 4],
                            [10, 8, 3],
                            [10,20,42],
                            [10,17,25],
                            [ 9,53,31],
                            [ 9,46,36]])
initDeltas_dec2 = np.array([[14,29,56],
                            [15,21,27],
                            [20,27, 7],
                            [11,54,10],
                            [16,41,53],
                            [19,46,29],
                            [23,21, 5],
                            [25,56,41],
                            [23,42,47]])
initDistances = np.array([36.18,177.65,57.71,77.49,2131.74,125.64,259.68,133.02,250.7]) #单位为光年
转为直角坐标
python
initAlphas = time2Dec(initAlphas_time)
initDeltas = dec22Dec(initDeltas_dec2)
initPosX, initPosY, initPosZ = sphere2Rect(initDistances, initAlphas, initDeltas)
initPosA = np.array([initPosX, initPosY, initPosZ])
initPosM = np.mat(np.array([initPosX, initPosY, initPosZ]))
我们后退的策略是面朝狮子的肚子——赤经赤纬大致如下的方向退行
python
shiftAlpha_time = np.array([10,43,14])
shiftDelta_dec2 = np.array([18,9,3])
sx = 40
Step = 0.2
diss = range(0,np.fix(Max/Step))
fig = plt.figure()

for i in diss:
        dDis = i*Step
        deltaA = np.array([deltaX[0], deltaY[0], deltaZ[0]]) * (dDis)
        deltaAA = np.kron(np.ones((9,1)),deltaA).T
        afterPosA = initPosA + deltaAA
        afterPosM = np.mat(afterPosA)
        afterXY = StereographicProjection(time2Dec(np.array([12,00,0])),dec22Dec(np.array([0,0,0])),8,"rect",afterPosA)
        angularText = xyzAngularDistance(afterPosA.T[0,:],afterPosA.T[8,:])

        ax = fig.add_subplot(111)
        ax.scatter(afterXY[0],afterXY[1],s=markScales)
        ax.scatter(fixXY[0],fixXY[1],c='r',s=20)
        ax.set_xlim(0,3)
        ax.set_ylim(0,3)
        ax.set_title('Distance= '+str(dDis)+' LightYear\n'+ 'Angular Distance= '+str(angularText)+'Degrees')
        ax.set_xticklabels([],visible=False)
        ax.set_yticklabels([],visible=False)
        plt.savefig('fig'+str(i),format='png')
        fig.delaxes(ax)hiftAlpha = time2Dec(shiftAlpha_time)
shiftDelta = dec22Dec(shiftDelta_dec2)
deltaX, deltaY, deltaZ = sphere2Rect(np.array([1]),shiftAlpha, shiftDelta)
进行球极投影,制作退行动画帧
python
Max = 40
Step = 0.2
diss = range(0,np.fix(Max/Step))
fig = plt.figure()

for i in diss:
        dDis = i*Step
        deltaA = np.array([deltaX[0], deltaY[0], deltaZ[0]]) * (dDis)
        deltaAA = np.kron(np.ones((9,1)),deltaA).T
        afterPosA = initPosA + deltaAA
        afterPosM = np.mat(afterPosA)
        afterXY = StereographicProjection(time2Dec(np.array([12,00,0])),dec22Dec(np.array([0,0,0])),8,"rect",afterPosA)
        angularText = xyzAngularDistance(afterPosA.T[0,:],afterPosA.T[8,:])

        ax = fig.add_subplot(111)
        ax.scatter(afterXY[0],afterXY[1],s=markScales)
        ax.scatter(fixXY[0],fixXY[1],c='r',s=20)
        ax.set_xlim(0,3)
        ax.set_ylim(0,3)
        ax.set_title('Distance= '+str(dDis)+' LightYear\n'+ 'Angular Distance= '+str(angularText)+'Degrees')
        ax.set_xticklabels([],visible=False)
        ax.set_yticklabels([],visible=False)
        plt.savefig('fig'+str(i),format='png')
        fig.delaxes(ax)
其中天球坐标转换子函数源于上学期处理实测数据时自己编的pyAstroCords包
使用GIMP合成退行图像,如图(请耐心等待GIF加载)

图示:蓝色点表示狮子座中的9课亮星,九个红点为从左到右赤经12h,11h,10h、从上倒下赤纬30°,20°,10°的整数格点,作为参照。投影方式为球极投影(Stereographic Projection),投影中心为(12h,0°),Angular Distance指1号星和9号星在天球上的角距
可以看出,退行4.4个光年左右,狮子座整体就在30度的视场中了
真还不如去买个全幅相机….